Quickstart
Learn to develop and control K-Scale robots with our open-source software.
Introduction
pykos is a Python client for the K-Scale Operating System (KOS), allowing you to interact with various services provided by KOS, such as controlling actuators, accessing IMU data, managing processes, and more.
Installation
To install pykos, you can use pip:
pip install pykosGetting Started
First, import the pykos module and create an instance of the KOS client. Remember to connect to the robot through the cable or ip.
from pykos import KOS

# Connect to KOS running on localhost at port 50051
client = KOS(ip='localhost', port=50051)
Replace 'localhost' and 50051 with the IP address and port where your KOS server is running.
Services
The KOS client provides several services, each accessible via the client object. Below are the services and examples of how to use them.
Actuator Service
Control actuators connected to the robot.
Actuator Definition
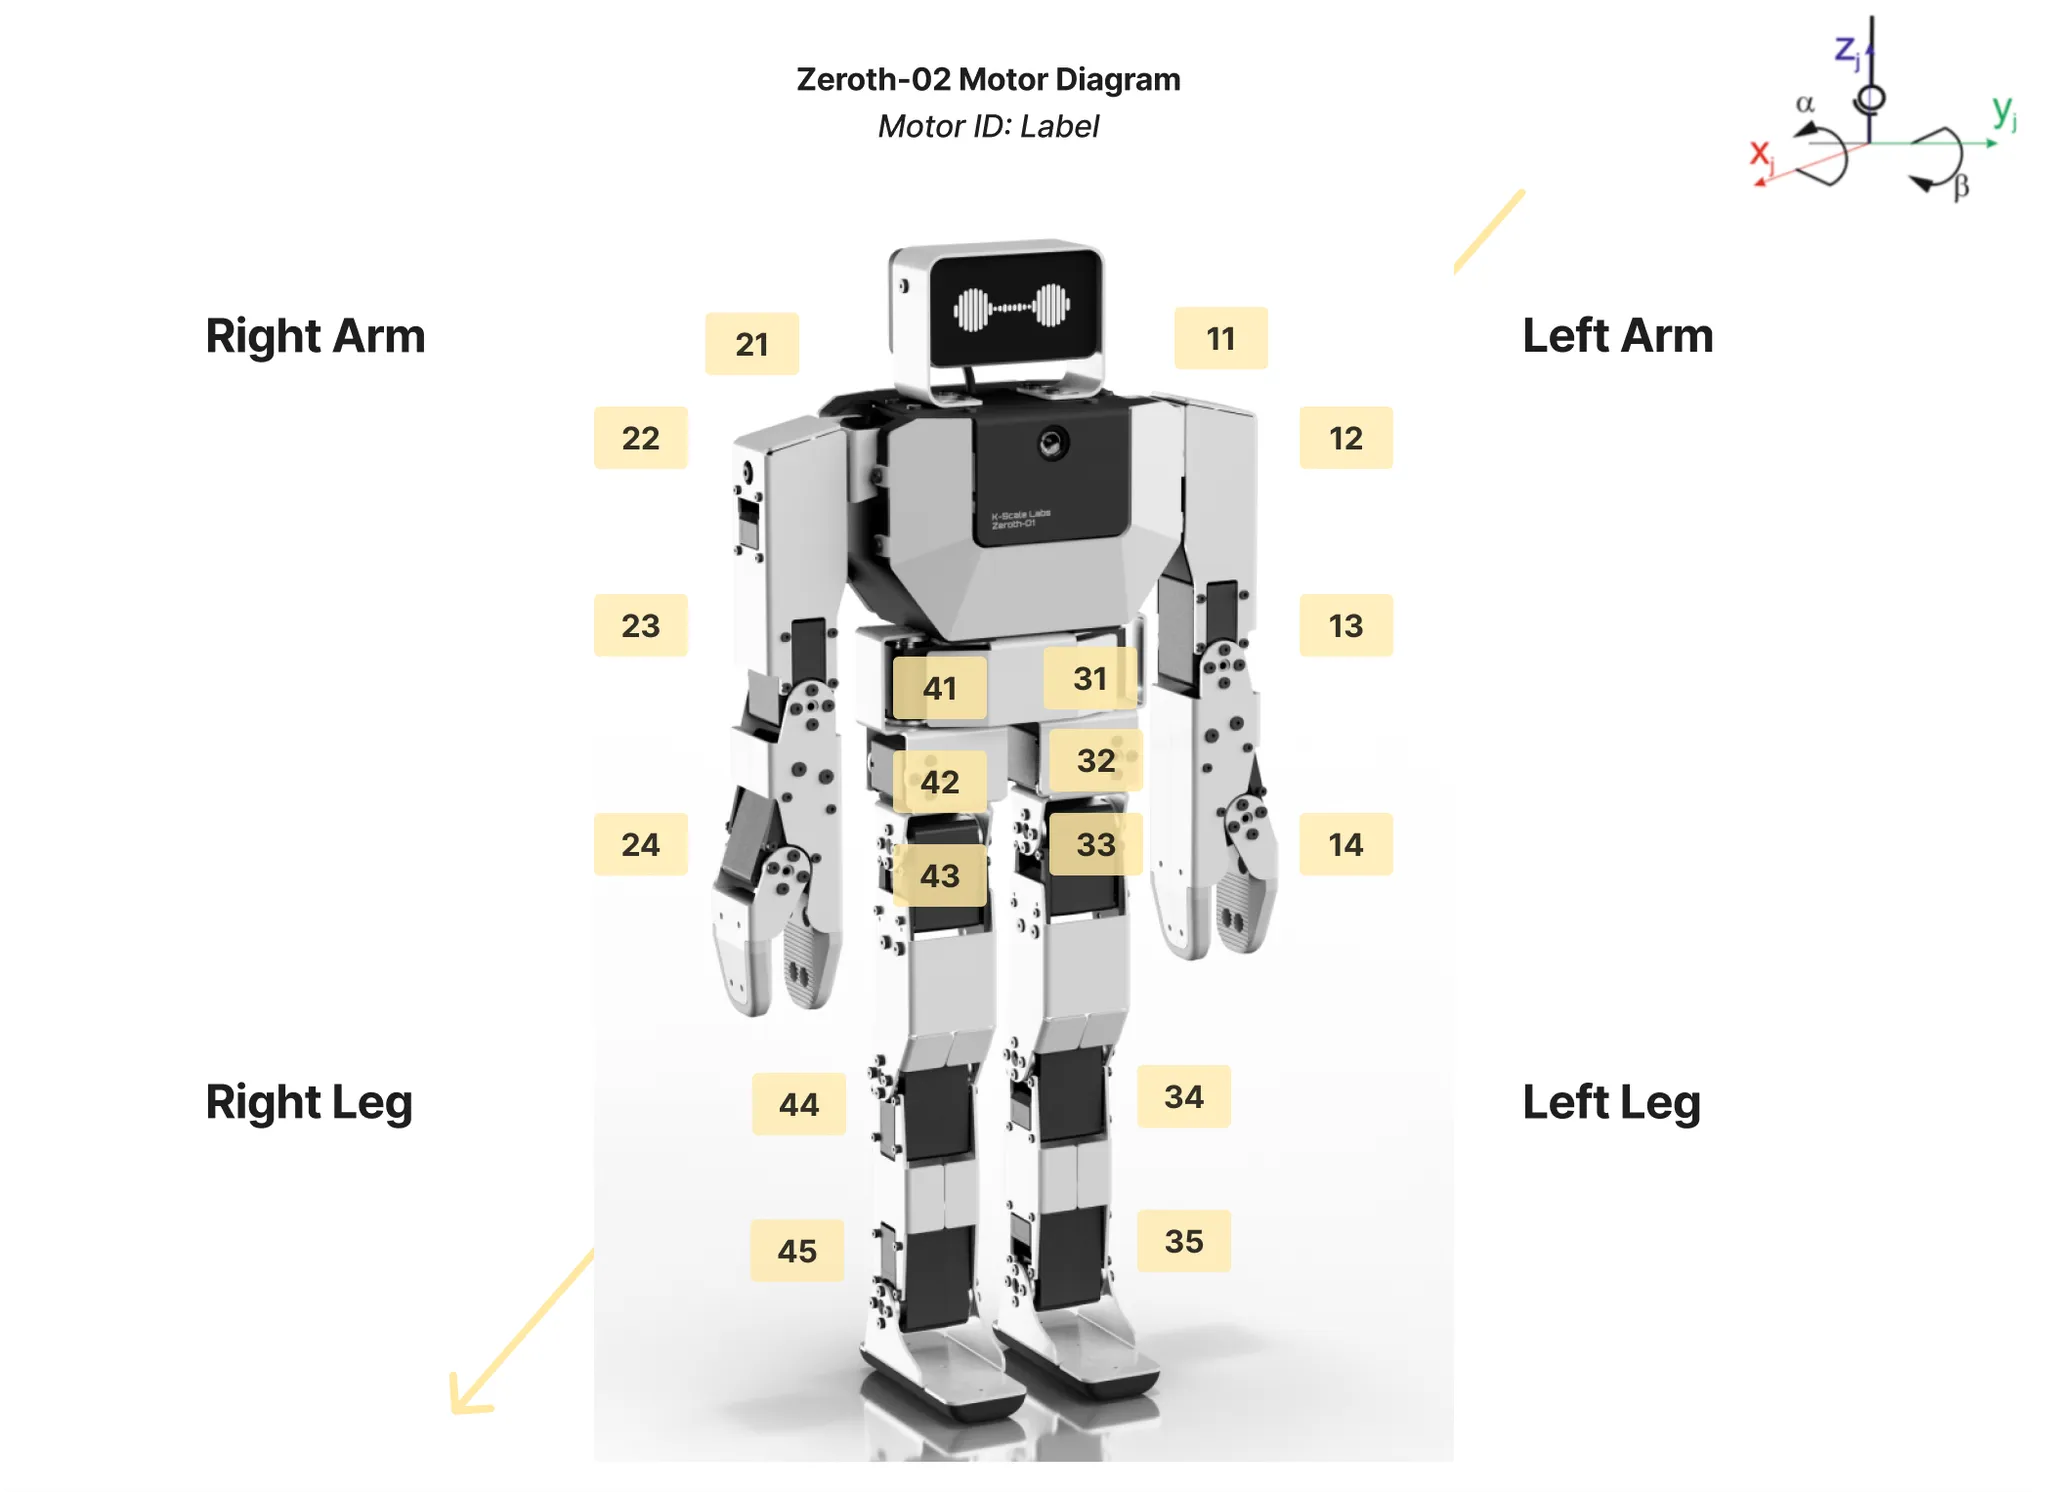
Use this convention to assign names to actuator IDs:
ACTUATOR_NAME_TO_ID = {
    "left_shoulder_yaw": 11,
    "left_shoulder_pitch": 12,
    "left_elbow_yaw": 13,
    "left_gripper": 14,
    "right_shoulder_yaw": 21,
    "right_shoulder_pitch": 22,
    "right_elbow_yaw": 23,
    "right_gripper": 24,
    "left_hip_yaw": 31,
    "left_hip_roll": 32,
    "left_hip_pitch": 33,
    "left_knee_pitch": 34,
    "left_ankle_pitch": 35,
    "right_hip_yaw": 41,
    "right_hip_roll": 42,
    "right_hip_pitch": 43,
    "right_knee_pitch": 44,
    "right_ankle_pitch": 45,
}

ACTUATOR_ID_TO_NAME = {v: k for k, v in ACTUATOR_NAME_TO_ID.items()}
Example: Configure an Actuator
# Configure actuator with ID 1
response = client.actuator.configure_actuator(
    actuator_id=1,
    kp=32,
    kd=32,
    ki=32,
    max_torque=100.0,
    torque_enabled=True,
    zero_position=True
)
if response.success:
    print("Actuator configured successfully.")
else:
    print(f"Failed to configure actuator: {response.error}")
Example: Command
# Command multiple actuators
commands = [
    {"actuator_id": 1, "position": 90.0},
    {"actuator_id": 2, "position": 180.0}
]
response = client.actuator.command_actuators(commands)
for result in response.results:
    if result.success:
        print(f"Actuator {result.actuator_id} commanded successfully.")
    else:
        print(f"Failed to command actuator {result.actuator_id}: {result.error}")
IMU Service
Access the Inertial Measurement Unit (IMU) data.
Example: Get IMU Values
# Get basic IMU sensor values
imu_values = client.imu.get_imu_values()
print(f"Accelerometer X: {imu_values.accel_x}")
print(f"Gyroscope Z: {imu_values.gyro_z}")
Example: Zero the IMU
# Zero the IMU with default parameters
response = client.imu.zero(duration=1.0)
if response.success:
    print("IMU zeroed successfully.")
else:
    print(f"Failed to zero IMU: {response.error}")
LED Matrix Service
Control an LED matrix display.
Example: Get Matrix Info
# Get LED matrix information
matrix_info = client.led_matrix.get_matrix_info()
print(f"Matrix size: {matrix_info.width} x {matrix_info.height}")
Example: Write to the LED Matrix
# Create a buffer to turn all LEDs on
buffer_size = (matrix_info['width'] * matrix_info['height']) // 8
buffer = bytes([0xFF] * buffer_size)

# Write buffer to the LED matrix
response = client.led_matrix.write_buffer(buffer)
if response.success:
    print("LED matrix updated successfully.")
else:
    print(f"Failed to update LED matrix: {response.error}")
Sound Service
Play and record audio using the robot's speakers and microphones.
WIP KOS Feature: The sound service requires an environment set up with Alpine Linux.
Preparing the Environment
- Copy the test script to the robot:
scp -O audio_test.py root@<KOS_IP_ADDRESS>:/root/alpine/root/Replace <KOS_IP_ADDRESS> with the IP address of your KOS device.
- Connect to the robot via SSH and prepare the environment:
   ssh root@<KOS_IP_ADDRESS>
   chroot /root/alpine
   cd /root
   source venv/bin/activate
Running the Audio Test Script
python3 audio_test.pyTo record longer audio (e.g., 30 seconds):
python3 audio_test.py --duration 30Copying Recorded Audio Back to Your Computer
scp -O root@<KOS_IP_ADDRESS>:/root/alpine/root/recorded_audio.wav .Example: Audio Test Script
`import sounddevice as sd
import soundfile as sf
import argparse

# Default parameters
DEFAULT_DURATION = 5  # Default recording duration in seconds

def main(duration):
    # File to store the recorded audio
    output_file = "recorded_audio.wav"

    # Device parameters
    record_device_id = 0      # Microphone device index
    playback_device_id = 1    # Speaker device index
    channels = [2]            # Use channel 2 of the microphone
    samplerate = 44100        # Sampling rate in Hz

    try:
        # Step 1: Record audio
        print(f"Recording for {duration} seconds...")
        audio_data = sd.rec(int(duration * samplerate), samplerate=samplerate,
                            channels=len(channels), device=record_device_id, dtype='float32', mapping=channels)
        sd.wait()  # Wait until recording is finished
        print("Recording finished.")

        # Save the recorded audio to a WAV file
        sf.write(output_file, audio_data, samplerate)
        print(f"Audio saved to {output_file}")

        # Step 2: Play back the recorded audio
        print(f"Playing back the recorded audio...")
        data, samplerate = sf.read(output_file)
        sd.play(data, samplerate=samplerate, device=playback_device_id)
        sd.wait()  # Wait for playback to complete
        print("Playback finished.")
    except Exception as e:
        print(f"An error occurred: {e}")

if __name__ == "__main__":
    parser = argparse.ArgumentParser(
        description="Record and play back audio with adjustable duration."
    )
    # Add argument for duration
    parser.add_argument(
        "--duration",
        type=int,
        default=DEFAULT_DURATION,
        help="Recording duration in seconds (default: 5).",
    )
    args = parser.parse_args()

    # Run the main function
    main(args.duration)
Computer Vision with KOS
Integrate computer vision capabilities with KOS using WebRTC.
WIP KOS Feature: The computer vision service requires WebRTC connection.
Requirements
Install the necessary Python packages:
pip install aiortc opencv-python requests
Example: Display Video Stream
import asyncio
import base64
import requests
import cv2
from aiortc import RTCPeerConnection, RTCSessionDescription, VideoStreamTrack
import logging

logging.getLogger('ffmpeg').setLevel(logging.ERROR)

# Server URL (replace with your actual server URL)
SERVER_URL = "http://<KOS_IP_ADDRESS>:8083/stream/s1/channel/0/webrtc?uuid=s1&channel=0"

# Video Display Track
class VideoDisplay(VideoStreamTrack):
    def __init__(self, track):
        super().__init__()
        self.track = track

    async def recv(self):
        frame = await self.track.recv()
        img = frame.to_ndarray(format="bgr24")
        # Do something with the frame, e.g., display or object detection
        cv2.imshow("WebRTC Video", img)
        cv2.waitKey(1)
        return frame

async def main():
    pc = RTCPeerConnection()
    pc.addTransceiver("video", direction="recvonly")

    @pc.on("track")
    def on_track(track):
        if track.kind == "video":
            display = VideoDisplay(track)
            asyncio.ensure_future(display.recv())

    # Create and set local description
    offer = await pc.createOffer()
    await pc.setLocalDescription(offer)

    # Send offer to server
    sdp_offer_base64 = base64.b64encode(pc.localDescription.sdp.encode("utf-8")).decode("utf-8")
    # Prepare headers and data
    headers = {
        "Content-Type": "application/x-www-form-urlencoded; charset=UTF-8",
        "X-Requested-With": "XMLHttpRequest",
    }
    data = {"data": sdp_offer_base64}

    # Send HTTP POST request
    response = requests.post(SERVER_URL, headers=headers, data=data, verify=False)
    response.raise_for_status()

    # Decode the base64 SDP answer from the server
    sdp_answer = base64.b64decode(response.text).decode("utf-8")

    # Set remote description
    await pc.setRemoteDescription(RTCSessionDescription(sdp=sdp_answer, type="answer"))

    try:
        while True:
            await asyncio.sleep(1)
    except KeyboardInterrupt:
        pass
    finally:
        cv2.destroyAllWindows()
        await pc.close()

if __name__ == "__main__":
    asyncio.run(main())
Explanation
- Server URL: Replace <KOS_IP_ADDRESS> with the IP address of your KOS device.
- Video Processing: Inside the recv method, frames are received and can be processed or simply displayed using OpenCV.
- SSL Verification: verify=False is used in the requests.post call. If your server uses SSL certificates, you may need to handle SSL verification accordingly.
Process Manager Service
Manage processes on the robot.
Example: Start KClip Recording
# Start KClip recording with an action
response = client.process_manager.start_kclip(action="wave")
if response.success:
    print(f"KClip recording started. Clip UUID: {response.clip_uuid}")
else:
    print(f"Failed to start KClip recording: {response.error}")
Example: Stop KClip Recording
# Stop KClip recording
response = client.process_manager.stop_kclip()
if response.success:
    print(f"KClip recording stopped. Clip UUID: {response.clip_uuid}")
else:
    print(f"Failed to stop KClip recording: {response.error}")
Inference Service
Upload models and perform inference.
Example: Upload a Model
# Upload a model file
with open('model.bin', 'rb') as f:
    model_data = f.read()

metadata = {
    "model_name": "MyModel",
    "model_description": "A sample model",
    "model_version": "1.0.0",
    "model_author": "Your Name"
}
response = client.inference.upload_model(model_data, metadata)
if response.success:
    print(f"Model uploaded successfully. UID: {response.model_uid}")
else:
    print(f"Failed to upload model: {response.error}")
Example: Run Inference
# Prepare input tensor
input_tensor = {
    "values": [0.1, 0.2, 0.3],
    "shape": [{"size": 3, "name": "input", "dynamic": False}]
}
inputs = {"input_tensor": input_tensor}

# Perform inference
response = client.inference.forward(model_uid="your_model_uid", inputs=inputs)
if not response.get('error'):
    outputs = response['outputs']
    print(f"Inference outputs: {outputs}")
else:
    print(f"Inference failed: {response['error']}")
Simulation Service
Interact with the simulation environment.
Example: Reset the Simulation
# Reset simulation with specific parameters
response = client.sim.reset(
    initial_state={"qpos": [0.0, 0.0, 0.0]},
    randomize=True
)
if response.success:
    print("Simulation reset successfully.")
else:
    print(f"Failed to reset simulation: {response.error}")
Example: Step the Simulation
# Step the simulation forward by 10 steps
response = client.sim.step(num_steps=10)
if response.success:
    print("Simulation stepped forward.")
else:
    print(f"Failed to step simulation: {response.error}")
Closing the Client
When you're done using the client, be sure to close the gRPC channel:
client.close()Updated 9 days ago